Saturday, February 1, 2014

Lindy's Stamp Gang January Color Challenge...

Hey Crafty People! ;)

So I wasn't sure if I'd be entering into Lindy's Stamp Gang January Color Challenge this month because there are some uber AWESOME projects up there! But, I figured "Hey, I did the hard part in creating something, so I might as well just go all the way and share what I was inspired to create!" :D So, without further ado, here are the colors we were challenged to use!

Aren't those super GORGEOUS colors?! So shabby vintage! ;) 
Anyways, here's what I started out with:


The candle holder (I think...) on the right is something I picked up at a flea market when I visited my home island of Guam last summer. As soon as I saw it, I knew I HAD to alter it! So, naturally, I grabbed all the pieces I could find! But, I wanted it a bit taller, so I bought some of the more traditional candle holders (like on the left) to use as a base!


And this was the result! I glued the two pieces together with E6000 and used SEI's Chocolat paper collection. It had the **PERFECT** gray and pink and brown tones to match the color challenge! I used Lindy's Down the Rabbit Hole to spray Venice Lace Trim a taupe-y grayish color to match the paper better. And all the flowers are sprayed with either Down the Rabbit Hole, A Bit o'Bubbly, or Salt Water Taffy.  I even experimented a little with the rosebud behind the largest flower at the base by using Lindy's Golden Angel Wings embossing powder on it! And OMGEE! The SHIMMER!!! :D That little rosebud is heaven on a flower! ;)

Here are some more views of my altered project... :D


Beneath the doily inside the cup, you can see that I filled the space where a candle would go in the holder with pink, cream, and white pearl beads...\
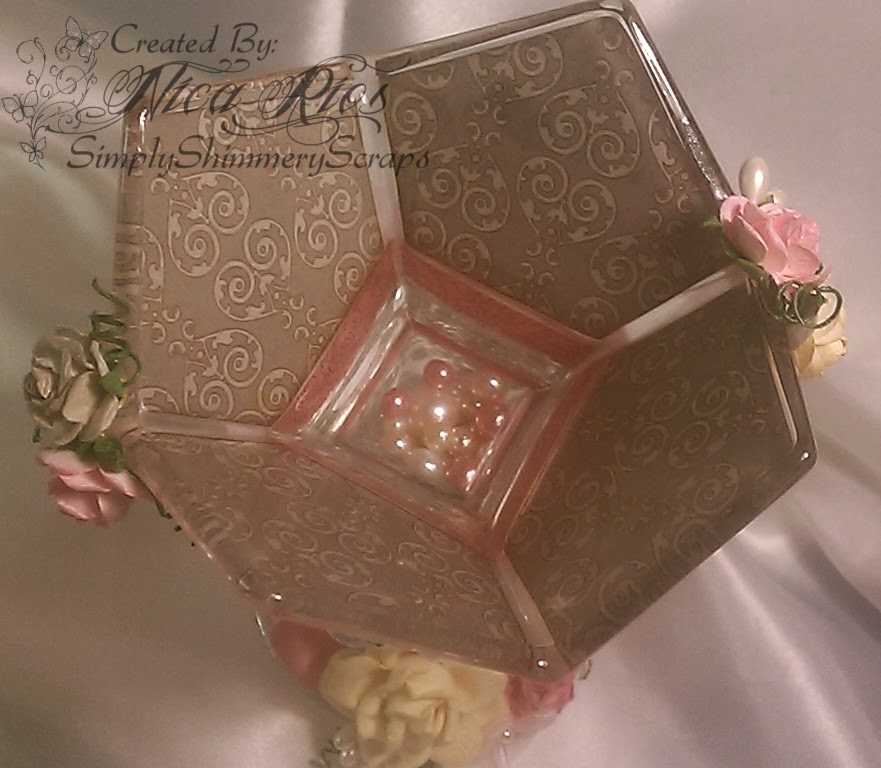

I thought it's be a great way to add interest to an otherwise boring, empty, underutilized space... :D
And now, if ya'll have been following me, you probably guessed that I HAD to make some sort of pretty packaging for this gorgeous container!


So, yes, I HAD to make a display box for this gorgeous piece! And, since I wanted a PERFECT fit, of course I had to custom make the box out of medium-weight chipboard. I used the same SEI paper collection to match the container, and then I sprayed the entire box with a bit of LSG Salt Water Taffy to give the box a bit of pink shimmer... :D All that extra effort was well worth it, don't you think?


Anywho, thanks so much for stopping by! I'll catch ya'll later with another project! ;)
♥s & hugs,


SUPPLIES:
Sprays: Lindy's Stamp Gang: Down the Rabbit Hole, A Bit o'Bubbly, and Salt Water Taffy
Embossing Powder: Golden Angel Wings
Paper: SEI Chocolat, Medium-Weight Chipboard
Flowers: I Am Roses: White R77-15, White T26-151, White R21-1, White R3-15
Ribbon: The Ribbon Boutique 7/8" Lt. Pink Satin, One Little Dreamer Baby Pink Chiffon with Pearls Trim, Offray Baby Pink Bows with Pearls, White Teardrop Venice Lace Trim
Other Embellishments: Pearl Beads in Lt. Pink, Pink, White, and Ecru; Crocheted Doilies, Pearl Stamens, Recollection Pink Bling, and Micheal's Metal Word

Tuesday, January 28, 2014

Birthday Criss-Cross Easel Card...

Hi & hello there my crafty friends!

Yay! I have a card to share with you all! Now, mind you, cards aren't really my forte (yet! ;D hehehe!)... So it's probably not the best looking thing out there... But here it is! :D


This is my second go at a Criss-Cross Easel Card, and I know the picture isn't the best... 
After sending the card out to my friend, and looking at the pictures I took, I realized I should have taken a slanted shot so you can see the "easel" part of the card too... :( 
Oh well... Live & learn...


Then, because my card was so dimensional there was NO WAY it'd fit into an envelope, I created a box out of light-weight chipboard to house it. Plus, I wanted my friend to have a little sneak peek of what was inside the box! ;D All in all, I think it turned out pretty darn cute! I will definitely be trying to improve on my card-making though... Practice makes perfect, right? ;)

If anyone is interested in making one of these cards, I put together a little tutorial for my subscribers on YouTube... check it out and I hope to you try one of these super cute cards yourself! ;)


Have an awesome week! :D
♥s & hugs,


SUPPLIES:
Paper:  MME Lost & Flound 3 "Oliver", Stampin' Up! Naturals White
Stamps: Gorjuss Girls "I Gave You My Heart", Inkadinkadoo "It's Your Birthday"
Dies: Spellbinders "Labels 18", "A2 Filigree Delight", and "Fleur De Lis Accents"
Embellishments: I Am Roses flowers, Pearl stamens, Turquoise Bling Mesh, 1/8" and 1/2" White Satin Ribbon, Various Adhesive Rhinestones, Various Laces and Appliques

Sunday, January 26, 2014

New Year, New Beginnings... and a GIVEAWAY! YAY! :D

Ugh! It has been nearly an entire YEAR since I've posted anything on my blog! Goodness gracious... Is that a long time or what?! It hasn't been an easy past year though... soo much uncertainty and moving around going on... :( I hope this year is better! No, I KNOW this year is going to be better! =D We will make it so! ;)

Anyways, enough about that! =D Every new year comes with TONS of New Year's Resolutions... which all end up being dumped in the trash after a couple of months (sometimes sooner!)... So I'm going to try and keep mine simple and easy: 1) Get more crafty projects done, 2) Update my blog regularly, and 3).... Hmm, I don't have a three yet I think. But maybe I don't need one... Because I think number 2 is going to take A LOT of work already! :S We'll see how long this lasts... Hopefully I'll finally get one resolution under my belt! =D

Oh yeah! My title said something about a giveaway, right? =D Well, for those of you that follow me on YouTube, you'll know that my birthday was this past Tuesday (the 21st of January), and I decided to have a HUGE giveaway for my subscribers in celebration of my (blank) years here on Earth... ;) So, if you didn't already know this, head on over there and check out the AWESOME crafty goodies I'm giving away, subscribe, and comment! Easy peasy, right? =D


Anyways, have a GREAT weekend everyone! I'll be back shortly with a project share (I promise! ;D)...
♥s & hugs,

Wednesday, February 27, 2013

Whimsical Wednesday "Sketch It" Challenge...

Hello my fellow crafters!
I know I've been MIA for a couple of weeks, but I'm back and ready to get crafty with another Whimsical Wednesday Challenge!
This week, our challenge is to make a card or layout using this sketch


which was provided by my fellow Design Team member, Nanne!

Now, for the card I made! ;)

It's a really simple card, and mostly because I have THE hardest time making cards! I used Kraft cardstock for the base and then pop-dotted on that a layer of cream cardstock with some blue patterned paper from My Mind's Eye "Moments" 6"x6" paper pad. I distressed all the edges with Walnut Stain Distress Ink and even lightly ran a distressing tool to the edges of the blue patterned paper. I used a strip of stain navy ribbon to break up the paper a bit instead of using another piece of paper as seen on the sketch. 

I stamped and embossed one of the flourish images from one of Tim Holtz's stamps in the top right corner instead of the bottom left. For the sentiment, I used one of the stamps from Whimsical Design's   "Everyday Sentiments". And the really adorable bear? I paper pieced him (my VERY first time trying out this technique) from a digital stamp image provided to us by our generous sponsor this week, Shelley's Images!


So what do you have a chance to win this week? A $9.00 voucher! All you have to do is hop on over to the Whimsical Designs blog and submit your entry into the challenge! Easy peasy, right? So I hope to see your wonderful creations over on the blog!
Thanks for stopping by and have a fabulous week! ;)
♥s & hugs,

Wednesday, February 6, 2013

Whimsical Wednesday Challenge: Textiles...

Hey fellow Whimsical crafters! :D

How's your Wednesday going so far? Well, I hope it's going great! And it's going to get better with this week's awesome new challenge! It's Textiles! :D
All you have to do is add ribbon, lace, twine, fabric, or any other type of textile to your project! Easy peasy, right? ;)

Here's my project for this week...

I made a card! Crazy, right? Lols! I hardly EVER make cards... I find them kind of hard to do... :S But this card came about from last week's "Gina's Weekly Challenge" over at My Scrap Room.  It's an awesome "Flip & Gatefold" card.

Here's a quick video I did about it...

Our generous sponsor for this week's challenge is Freckled Fawn!
They are offering a chance to win a $20 Gift Certificate to their store!

So, head on over to the Whimsical Designs blog for more information and details on joining this challenge! Hope to see you all there!

♥s & hugs,

SUPPLIES USED:
Paper: MME Madison Avenue
Cardstock: Ivory, Dark Chocolate (Papertrey Ink), Pink Glitter (The Paper Studio)
Stamps: "With Love" (Whimsical Designs) and "Sending all my Love" (Craftsmart)
Ink: Versamark and Walnut Stain Distress Ink
Embossing Powder: Chestnut (American Crafts Zing)
Flowers: I Am Roses
Sprays: Caramel Apple & Creme de Rouge (Glimmer Mist)
Others: pink satin ribbon, Venice lace, heart doily, acrylic wheat spray, and Recollection bling


Friday, February 1, 2013

Whimsical Design's "Love" Blog Hop...

Hello all my fellow crafters and Whimsical friends!
Welcome to the Whimsical Designs "Love" Blog Hop! :D
If you are participating with us, you should have arrived here from Margie's blog...
If you need to start from the beginning of the hop, head on over to the Whimsical Designs blog and hop along from there! ;)

Sooo... here's a look at what I created for this awesome blog hop! :D
This is the matching mini album that I created to match the altered mailbox I showed a couple of weeks ago for our "Love is in the Air" Whimsical Wednesday Challenge.
To better explain this cute, itty bitty mini (and to FINALLY get a good view of the mailbox!), I made a quick little video! ;)


Pretty quick and simple, huh? :D So! How about some prizes and blog candy???
Our generous sponsors for this hop have graciously given us some prizes to give you all a chance to win for participating! They are:

Stamp-N-Doodle: with a chance to win 2 digi stamps of your choice,
Beccy's Place: with a chance to win 3 digi stamps of your choice, and
Miss Kate Cuttables: with a chance to win a $20 gift certificate for the store! 

And, if that weren't enough for ya'll, Stephanie of Whimsical Designs, is giving away some blog candy that includes:
A 6"x6" paper pad of MME Stella and Rose collection
2 balsa boxes
2 packs of alterable chipboard pieces
2 packs of ribbon and trim
3 small bottles of buttons
1 pack of kraft tags and twine
2 packs of bling
and 4 packs of flowers

Is that awesome or what??? ;) All you guys have to do is follow along with the blog and leave a comment on each designers' post! Easy peasy! ;) So... on to your next stop - Nanne's blog to see what amazing project she's cooked up for you guys! :D

Thanks a bunch of hopping by, and I'll see ya'll on the blogs! ;)
s & hugs,

SUPPLIES USED:
Chipboard
Paper: Prima's Romance Novel, Paper Studio's Black Glitter Paper
Cardstock: Stampin' Up!'s Basic Black
Flowers: I Am Roses
Glimmer Mist: Sugar Plum Fairy
Dies: Spellbinders' Labels 1, Labels 18, and Fleur De Lis Accents & TH Plaque and Postage On the Edge Die
Punches: Various Martha Stewart butterfly punches
Stamps: Whimsical Designs "With Love" stamp set
Others: Charms, Pearl beads, Metal Accents, Grosgrain Ribbon, Venice Laces, Rhinestones

Wednesday, January 30, 2013

Whimsical Wednesday's "Winter Wonderland" Challenge...

Hello my fellow crafters!
I'm back for another Whimsical Wednesday Challenge!
This Wednesday, our theme is "Winter Wonderland"! You can create anything you want as long as there is at least one snowflake and some glittery goodness added! :D

Here's a looksy at what I created for some inspiration!


It's a pincushion! I made the bottom part out of chipboard using the Sizzix Candy Cups die.  It was painted using a Ranger acrylic dabber in Denim and then coated once with Denim Dimensional Pearls for a bit of shimmery goodness. The sides are all decorated with a layered snowflake I went absolutely CRAZY for this past holiday season. I made TONS... seriously. :D The very front is decorated with a sentiment from Whimsical Designs "Snow Much Fun" stamp set. I thought I wouldn't get an opportunity to use this set anytime soon, and so I'm just sooo happy I did get to use it! :D For the trims, I just used some twisted white cord and chain from my holiday ribbon stash and some thin white satin ribbon on the bottom. I used a necklace I had gotten in a RAK from my friend Donna as a chain swag and added a charm and pearl to the end where the clasp is.

Here's a video I did on this project...


Anyways, that about wraps up my quick little project! I hope you can come check out what the other designs came up with for some more inspiration over at the Whimsical Designs blog, and join us in this * cool *, fun challenge! ;)

Oh! And before I forget... I just wanted to remind you all to stop by the Whimsical Designs blog Friday evening for our "Love is in the Air" February blog hop! Hope to see you there as well! ;)


Have a great day! And thanks for stopping by!
s & hugs,

Wednesday, January 23, 2013

Whimsical Wednesday's ♥ "All About Love" ♥ Challenge...

Good morning my fellow crafty friends!
Today is the beginning of a new Whimsical Wednesday Challenge! Yay!
And, with Valentine's Day fast approaching, our challenge this week is very appropriately
♥ "All About Love!" ♥
So break out those Valentine-y papers, heart punches, gorgeous ribbon, and lovey-dovey sentiments and let's get on with some inspiration! ;)

For this weeks challenge, I came up with this gorgeous altered mailbox! :D


This mailbox is completely made from scratch out of chipboard! Not bad for my first time, if I do say so myself! ;) It's about 4" tall, 3" wide, and 4" deep - so altogether not to big and not to small. There's a matching itty bitty mini that goes inside, but that's another project to show you another day... ;) hehehe!


To construct the mailbox, I used part of the Tim Holtz Vintage Cabinet Card Die as I am absolutely HORRIBLE at creating curves and circles free-handed. Plus, I could cut the paper for matting the sides absolutely perfectly every time! Bonus! :D The rest of the mailbox was just putting the pieces together - easy peasy!

The paper collection I used was the gorgeously stunning "Romance Novel" by Prima. Can I just say I'm in LOVE??? :D This was my first time working with the papers and I don't think I can go back to anything else! No wonder what all the hubba-baloo was about when these papers first came out! Now I gotta order some more and hoard it like crazy! ;)

Anyways, here's a closer look at the sides...


This is one of the cut-outs from the A4 paper sized pad. Awesome vintage feel! It's popped up on a redish-pinkish circle I cut out from the paper line and then matted on a black doily I die-cutted from a Spellbinder's die and then spritzed with "Sugar-Fairy Plum" Glimmer Mist. I just LOVE the shimmery-ness! I added some I Am Roses flowers to a couple of the corners and a couple of glittery butterflies.


This side is pretty simple. All around the mailbox I used a black flowery swag Venice lace to add a more romantic feel.  I glittered up some black cardstock again and used another Spellbinder's die to cut out the awesome looking label. I cut out a circle from the paper line for the middle and added a sentiment from the Whimsical Design's "With Love" stamp set. I had to stamp it a couple of times to get the whole sentiment to fit in the circle, but it was worth the time since I absolutely ♥ butterflies! I added some more IAR flowers in the corner and glittery butterflies and voila! On the flag part of the mailbox, I used a heart punch and then pop dotted the small heart which is from the "With Love" stamp set too. Cute! :D


The front is basically following the same theme as the sides. I used another Spellbinder's labels die to frame another lovey-dovey sentiment from the "With Love" stamp set. I also made a little charm dangle to hang from the bow as a sort of handle to pull the front down. It's more decoration than anything though as the box is kept closed by some magnets hidden under the flowers...


Pretty neat, huh? :D I'll be putting up a video later when I get my voice back from my silly cold!

So... I hope you enjoyed and got some inspiration from this! Don't forget to go check out the other Design Team members' amazing projects over at the Whimiscal Designs blog and join us for this fun, fun challenge! More information about the details for this week's challenge and the prize you have a chance at winning if you enter will also be posted over there! :D Hope to see you there and I just can't wait to see what ya'll create!

Thanks for stopping by!
♥s & hugs,

Wednesday, January 16, 2013

Whimsical Wednesday Challenge "Anything Goes!"...

Hey Everyone!

Yay! Today is the start of Stephanie Hedderick's Whimsical Wednesday Challenges!
This week's challenge is "Anything Goes!" So you can create anything you want - whether it be Holiday themed, something to say thank you, baby themed - whatever! ;)

Here's what I did for your inspiration pleasure!

This card and gift combo was for both my Design Team project and a swap I'm hosting on a ning site... :D Almost all the stamps I used on this project were from Stephanie's awesome, awesome stamp set "With Love," which you can find and purchase here!

Here's a video I did explaining the project a little more in depth! :D

So, come check out all the other DT members' creations and join in on this fun challenge on the Whimsical Designs blog!

Thanks for stopping by!

Friday, January 4, 2013

The Whimsical Designs Design Team...

Woohoo!!!
I have some awesomely, exciting news! About a week ago, I was asked to be on Stephanie Hedderick's Whimsical Designs Design Team! :D She has 4 sentiment stamps available for purchase that she designed herself! I just ♥ sentiment stamps! And I am soo excited to share with you all some ideas I have for using those stamps! She has also gathered together a really, REALLY awesome design team! The diversity in styles is pretty amazing, and between us all, I'm sure we can fit anyone's style! ;)

So meet the rest of the team! 
(To see their blogs, just click on their names... :D)

 Jen
    
In addition to checking out this awesome team, don't forget to visit the Whimsical Designs blog! Stephanie will be starting up her Whimsical Wednesday Challenges again on January 16th with some cool ideas and a giveaway! Yay!!! So check it out! ;)

Thanks for stopping by!
Hugs,

Friday, December 21, 2012

Advent Christmas - Day 7

Hey everyone!

**Whew** Am I behind on posting these, or am I behind? Hehe...
Yes, yes, I am way behind! It seems that the closer we get to the 25th, the less hours there seem to be in my day. Craziness! Well, that's still really no excuse for being so late in posting my Advent gifts... ;) Oh well. Here's day 7, which we were to open on the 15th... (Go ahead and say it... FINALLY! Lols!)


These gifts were given by Ms. Cindy Dillion... and pretty much surprised everyone in this swap! I'm pretty sure these had us all wondering if she had stayed within the spending limit! Haha...  She was just too, too sweet to send these gifts to us! :D


I think these chipboard pieces were my favorite! I'm a strong believer that you can never have too many alphabet options!


Aren't these just so cute! I'm definitely going to be using those pink glitter pieces! I think I have the perfect paper and project for them!

These are super cute too! I might use the blue one for my youngest's baby album!

Anyways, thank you Cindy, and I will catch all of you again in the next Advent post! ;)
Hugs,

Monday, December 17, 2012

Brown Packages tied with String Swap...

Hey everyone!

So, I joined a swap over at MSR last month (no surprise... hehehehe...)! It was hosted by the lovely Stephanie and was called "Brown Paper Embellishment Packages Tied Up with String." Sounds cute, huh? This swap was basically wrapping up 6 small embellishment goodies in brown wrapping paper and tying it with string! The wrapper could also be further embellished if we wished to do so. 
 
Well, for this swap, we had an odd number of participants and so we did a "round the house robin" kind of thing.  This means that one person will be sending me a box of goodies and I send my box to a completely different person.  I got in touch with the lady who I'm sending goodies to, and was able to procure a very good sized wish list! Also, in addition to her wish list, I found out the her favorite color is purple, which gave me the color of ribbon I wanted to tie my packages with! So, here's what everything looked like after I wrapped them all!


I think they turned out pretty gorgeous! :D And, as you can see, I actually sent 7 gifts instead of 6. I REALLY got into the wrapping. And, I think it's pretty ironic that my 7th gift is the ONLY wrapping I further stamped and embossed on. I would've done it to the rest, but all the others were either too small or too bulky to do so. Oh, well... still looks pretty! :D

Here's what I included in each of the packages for her and how I wrapped them:


First is a sampler of some flat-back pearls that I sell along with some bling trim in black. Marina, my partner, is a newbie to crafting and wanted some bling mesh, but I only had bling on a string. I gave her a yard each of the pearls and 2 yards of the bling. Hope that made up for that! :D
 

Next, Marina said she didn't mind receiving handmade goodies, so I made some fabric flowers  for her as well as a purple fabric butterfly! I mounted these on a couple of die cut card stock and included my info on the back.


 I also made a purple, black, and white charm dangle for her to use on a mini album if she wished to. I backed it on a small chipboard tag with my info on the back and packaged it in a pillow box.


Next, she requested some brads since she's getting really into using them. Luckily, I had a bunch of unopened packages of some Making Memories brads!


Last, on her wish list were some Tim Holtz items. I had a few different ideology things and trinkets, so I packaged them into a little gift box. I had also gotten her a Holiday/ Seasonal TH mask. I had gotten the idea to wrap this particular gift into a candy-like wrapper from my Advent Christmas swap. It turned out pretty cute! 

 Last, but not least, I decided to wrap up a K & Company Mat Pad and to stamp and emboss "Merry Christmas" and a whole bunch of snowflakes.


Anyways, that's all for now! Thanks for stopping by!